Adding memory to your Nook is fairly easy, and requires no tools.
A lot of people have been coming to WritAnon, trying to find instructions on how to add memory to Barnes & Noble’s Nook. This is mostly because I said adding memory was simple in one of my previous reviews of the Nook.
While the blog at WritAnon isn’t generally a technical blog, adding memory to a Nook is fairly easy, and it makes sense that writers would need to upgrade their Nooks.
The hardest part with upgrading your Nook’s memory is just getting started. The whole procedure should only take a few minutes.
Step 1: Bookmark this blog entry
If you haven’t already done step 2, you’ll likely need to bookmark this page so you can come back to it. If you have, you may still find a reason to come back, or send the instructions to a friend at a later time.
While you’re at it, consider subscribing to our RSS feed to find out more about writing for a living and pleasure. There is at least one post every week.
Step 2: Buy a MicroSD expansion card
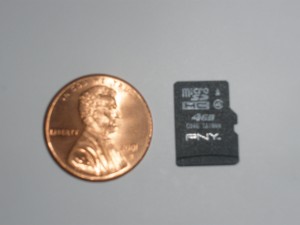
In order to do this upgrade, you’ll need a MicroSD card. I used a 4GB card made by PNY, but I’m fairly certain that virtually all of them are the same, just with a different name stamped on the cover.
MicroSD cards are very small…they can fit entirely on the surface of a penny.
If you don’t have a MicroSD card, you may want to purchase one. I’ve linked to a few different types below. Disclaimer: I get a few cents for each card purchased through these links, so this is a good way to thank me for the information included in this entry.
Step 3: Turn off your Nook
You’ll need to make sure your Nook is powered off all the way. You can do this by holding your power button (the silver button on the top of the Nook) for approximately 5 to 7 seconds.
Step 4: Pull off the back cover
Taking the back off of your Nook takes a bit of work, but it comes apart without the need for any tools.
If you look carefully at the side, you’ll notice a small thin gap, just large enough to put a fingernail in. If this is your first time opening up the back of your Nook, the safest bet is to place the Nook firmly against a soft surface as you pull the back cover off. This will take a fair amount of force, so be careful not to lift the Nook off of the surface.
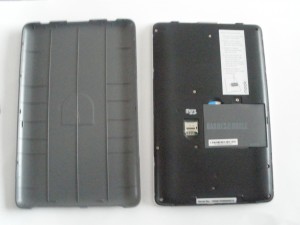
Once you get the back cover off, you should see something like this:
From here on out, the steps are actually pretty easy.
Step 5: Lift the memory card cover
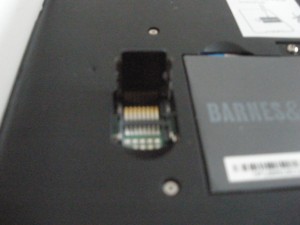
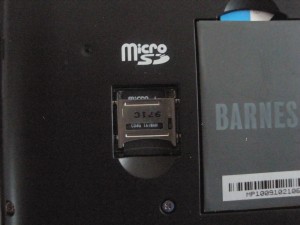
Once the back cover is off, you’ll see two things: the battery (the larger rectangle with the screw holding it down) and the memory card expansion slot. You should lift the cover as shown below.
You’ll see the electronics underneath are exposed so you can insert your MicroSD card.
Step 6: Insert your MicroSD memory card
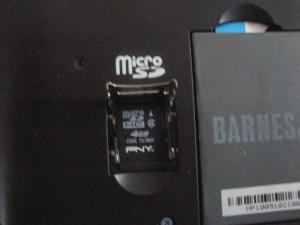
This sounds like more work than it is. All you have to do is lay the card so that the gold contacts on the card match the gold contacts on the Nook.
When you’re done with this, the installed card should look something like this (the cover is still open in this picture):
The card should lay flat and smooth, resting in the notches built into the card.
Step 7: Close the memory card cover
Assuming that the card was laying flat, this should take very little effort. There will be a very slight snap when the cover is in place, but unless your hearing is excellent, you probably won’t hear it.
Now the hard part is over, and you could test the new card now, if you wanted. However, since there’s a small chance you could bump the back cover and cause the memory card to fall out, you should proceed on to the next step.
Step 8: Replace the back cover
Make sure that you line up the cover correctly (the grooves for the power button are what I used), then snap the cover back on.
Step 9: Power on the nook, then go into the settings menu
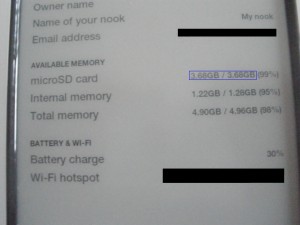
When you enter the settings menu, you should see your new microSD card show up in the available memory.
Now you’re ready to use your additional memory to store new pictures, songs, or, of course, more books.
Did you find this article helpful? Please leave a comment expressing your thanks below!
Tags: adding memory to a nook, ebook for writers, ereader for writers, microsd, Nook
Visit our: Community | Services | Store
Liked this blog entry? Vote up on Reddit or Tweet the URL!



 Need a website?
[…] Adding memory to the nook is actually fairly simple. […]
is there any way to register my nook, without wi-fi access????
The easiest way would probably be going to a local Barnes & Noble or someplace with free wi-fi access (coffee shops, etc). There appears to be no way to register without some kind of wireless connection.
Also, you should be able to use the wireless connection on your nook anywhere an iPhone works. I was able to do this from my house because I’m lucky enough to be in that area.
If you go to your local Barnes & Noble, registration is fairly easy. I’d watch this video before you go: http://www.barnesandnoble.com/nook/video.asp?#vid1
Hope this helps!
Perfect instructions – usefull photos – good job!
re: how to installadditional memory in my nook.
very impress with your explanation. I was able to install the new memory sitting in my car using my cell phone internet display and my finger nail in under 10 mins. and that doing it as I read your instructions for the 1st time. as I never had the ‘nook’ apart before or knew how to do it, i’m impressed!
johns.
Glad that these instructions worked so well for you! Happy reading.
Thanks for the easy instructions! It worked perfectly!
I’m glad! Enjoy your extra space for more books.
Thanks for doing the explanation. I was beginning to think I was mislead about increasing the capacity when not seeing a memory card slot on my recently purchased Nook– until doing a Google search and fortunately finding this article right away– the clear instructions were perfect!
However, since the variety of memory cards and range in prices is excessive, it may be useful to point out why and understand what the 2 main indicators (SD/SDHC & CLASS) on the card means; which will explain why cards with the same size in Gigabytes are widely different in prices and help eliminate confusion when deciding what’s best for the situation.
Although one would be right thinking they’re constantly improving in quality, it really has to do with the larger capacity (4GB, 8GB) having improved handling with cards indicating the newer SDHC standard– if that’s important, then avoid buying the older inexpensive deprecated SD standard.
The other indicator, CLASS (or a letter C variation), indicates the transfer speed– the responsiveness between the card and the eReader– with a number to its right. (I think) each even number increase implies a halving in transfer speed– your wait time– with 10 presently being about the best. However, if the CLASS number is missing, it’s likely the very outdated CLASS 1 or 2, especially if the card is labeled with the older SD format. (Some of the cheaper ones require a formatting– a simple “when-explained” non-issue everyone should be aware of– prior to actual use.)
Of course, all of this boils down to deciding what’s best for the one’s budget and personal use; perhaps this post will help others from going through what I did when I first ran into not knowing this was problem until it was too late and useful enough for this article without being too much out of context. (It seemed appropriate, since, in my defense, you did mention being compensated if your site sold a memory card.) Thanks.
Wow, thanks for the excellent and detailed explanation! Anyone looking to purchase a card, please read through Hutsell’s guidelines.
Personally, I just bought the cheapest one that seemed to cover my needs. However, I think that getting a better quality one to help with refresh rates sounds like an excellent idea!
Great explanation. I was able to do this upgrade on my daughter’s Nook on the first try in under 5 minutes after reading your description only once!
I wish all tech-related explanations were as easy to understand and follow as this was.
Glad to hear it, Kevin! Always pleased to hear that we’ve nailed an article.
Hope your daughter enjoys the extra space!
I went along not even thinking Id need more memory at some point. I purchased a book and it wouldn’t download. It took me a bit to figure out I was out of memory. I happened upon this website trying to figure out how to get more memory. All is well with the memory now but the last book i downloaded still isnt there. I tried to purchase it again but it wouldnt let me because its already downloaded (make sense?). What are your thoughts?
According to http://bookclubs.barnesandnoble.com/t5/NOOK-Technical-Support/Questions-on-Multiple-Nooks-Multiple-Accounts-DRM/td-p/559217 , the user named “very-simple” indicates there’s a way to force a redownload. I’d give that a shot.
You also might try downloading the book to your computer from your NOOK library at bn.com. You could then copy it over to your Nook using the USB cable (that doubles as a power cord).
Hope this helps. Let me know if it does!
Thanks very much for this clear and straightforward explanation. The upgrade to 4gb was 5 minutes start-to-finish.
Great! I’m glad this worked so well for you.
Thank you for your clear, concise explanation of how to add the memory card. I had looked several times trying to find it on B&N’s site as well, but never found it ’til I googled it and found your blog. I never thought you would have to remove the back. That is counterintuitive, since you usually would not disassemble your electronic devices. Thanks again.
I agree, it does seem unintuitive. That was a major reason I wrote this article when I decided to upgrade. Glad it helped!
I installed the 16g chip into my Nook 3g. I can see the chip on my computer and in my Nook settings. I can not access any of the audio files that I put on the chip. How does Nook find the files?
According to B&N, the only audio format supported is MP3. You might want to double-check what file format you’re using for your audio files. I’d guess that’s the core problem here.
Thanks so much for this. I was worried that I might break something, but this was so simple. Thanks again!!!!
I can definitely understand your concern, especially with the chip being so tiny. Happy reading!
Great Stuff!!
Our 8GB SDHC arrived today and after a quick look at the outside of the nook I could see that it was not going to be as easy as I thought it might be to install the card. I had a look at the users guide and not a word about it that I could see. Surely to heavens useful things like installing an expansion card should be in the users guide (Shame B and N).
Thank you so much for taking the time and trouble for preparing your guide. The only time I got into trouble was when I tried to get ahead of the instructions (hideous LOL).
We really appreciate the help and I’ll try to buy as many micro SDHC cards as I can afford.
Cheers!
Thank you so much for this! I just gave my husband his Father’s Day present, a Nook, but we couldn’t figure out how to add the tiny memory card. I googled “install external memory in Nook” and you were the second link. Thank you so much for making it a breeze for us!
love this made it so easy
Thanks. Your notes were clear and helpful. Pictures were perfect. I will sign up for the blog as well now. Keep up the good work.
I was so happy to find someone had taken the time and patience to write directions for the normal technical minded person. It was written in a language (and the pics help a lot too!) that it was a sinch to follow and understand what one had to do and what one should look for that I vote you a rating of 10 out of 10. Thank you so much!
So glad this helped you out. Made my day!
I have installed a 16gb card. I put epub books and mp3 files on it before I installed it. My Nook found no files when I turned it back on. The books were in folders by author. Is that the problem? Should I load each epub separately? Or do you just put in the card and keep adding to the documents and music folder and it overflows to the extra memory when the original memory is full? Can anyone explain how it works? I erased the 16gb card and put it back in, and got my other files back into view. Thanks.
The most likely cause of the card not showing up is that it shifted when the nook back cover was being put back on.
The other alternative, if you already have your card installed and showing up, is to transfer everything over the USB cable. It will be slow, but at least it saves opening the nook back up again. Hope this helps!
Installing the card was the easy part. Now how do you put files on it? Haven’t been able to find that answer anywhere yet.
Never mind – just “talked” with chat at B&N. So easy if you know what to look for. The memory card shows up on my computer as a removable disk – not in the Nook icon
Thank you so much!!! I had no idea that it would be that easy to get my music on my nook. Now I can read and listen to my favorite songs at the same time.
Pennie